
Androidエンジニアの藤樫です。
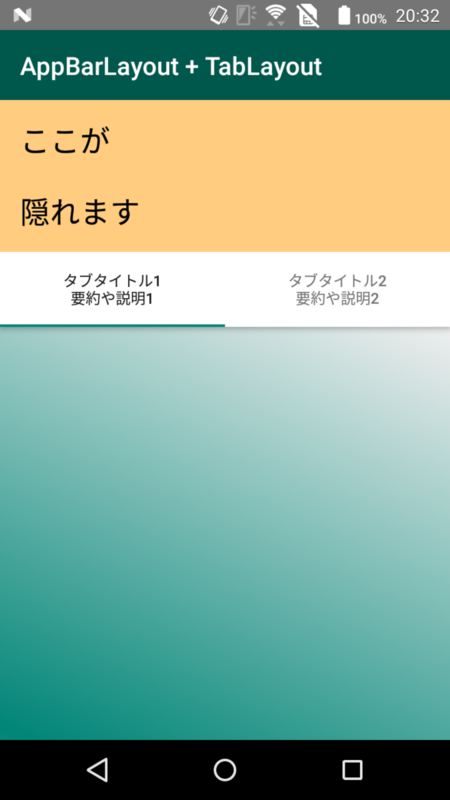
OpenWorkアプリの企業画面では、「企業トップ」「社員クチコミ」などが並ぶTabLayoutの表示がスクロール位置によって切り替わります。最初にページを開いた時は各タブに何件コンテンツが存在するかを表示して、最上部にある時は件数表示を省略してタブの高さを低くしています。ユーザーが特定のタブのコンテンツを見ている時は余分な情報を省いてコンテンツ領域を広げて見やすくしようという狙いがあります。

本記事では、この画面をどのように実装しているかを紹介します。
実装
以下のように単純化した画面で説明します。
CoordinatorLayoutと AppBarLayoutとAppBarLayout.ScrollingViewBehaviorを使えば、AppBarLayoutとTabLayoutのスクロールをViewPagerのスクロールと連動させるAndroidアプリお馴染みのレイアウトが実現可能ですが、その際にTabLayoutの高さを変えるのは既存クラスを単純に組み合わせただけでは実現できなさそうです。例えばTabLayoutにandroid:layout_height="wrap_content"を設定して、タブに2行タイトルが設定された状態でTabLayout.getTabAt(0).text = "1行タイトル"と設定したとしても、TabLayoutの高さは変わってくれません。
ではどうするかと言うと、以下のようなレイアウトを組んで、
<layout
    xmlns:android="http://schemas.android.com/apk/res/android"
    xmlns:app="http://schemas.android.com/apk/res-auto">

    <androidx.coordinatorlayout.widget.CoordinatorLayout
        android:layout_width="match_parent"
        android:layout_height="match_parent">

        <com.google.android.material.appbar.AppBarLayout
            android:id="@+id/appBarLayout"
            android:layout_width="match_parent"
            android:layout_height="wrap_content"
            android:stateListAnimator="@animator/appbar_elevation"
            android:background="@color/white">

            <com.google.android.material.appbar.CollapsingToolbarLayout
                android:id="@+id/collapsingToolbarLayout"
                android:layout_width="match_parent"
                android:layout_height="wrap_content"
                app:layout_scrollFlags="scroll|exitUntilCollapsed">

                <!-- contentInsetStartを0にしないと左に不要な余白が表示される -->
                <androidx.appcompat.widget.Toolbar
                    android:layout_width="match_parent"
                    android:layout_height="44dp"
                    android:layout_gravity="top"
                    android:minHeight="44dp"
                    app:contentInsetStart="0dp"
                    app:layout_collapseMode="pin">

                    <com.google.android.material.tabs.TabLayout
                        android:id="@+id/tabLayoutCollapsed"
                        android:layout_width="match_parent"
                        android:layout_height="44dp"
                        android:visibility="invisible"
                        android:background="@color/white"
                        app:tabTextAppearance="@style/TabTextAppearance" />

                </androidx.appcompat.widget.Toolbar>

                <LinearLayout
                    android:layout_width="match_parent"
                    android:layout_height="wrap_content"
                    android:orientation="vertical">

                    <TextView
                        android:layout_width="match_parent"
                        android:layout_height="wrap_content"
                        android:padding="16dp"
                        android:background="@color/orangeLite"
                        android:textSize="24sp"
                        android:textColor="@color/black"
                        android:text="@string/app_bar_collapsible" />

                    <com.google.android.material.tabs.TabLayout
                        android:id="@+id/tabLayout"
                        android:layout_width="match_parent"
                        android:layout_height="60dp"
                        android:background="@color/white"
                        app:tabTextAppearance="@style/TabTextAppearance" />

                </LinearLayout>

            </com.google.android.material.appbar.CollapsingToolbarLayout>

        </com.google.android.material.appbar.AppBarLayout>

        <androidx.viewpager.widget.ViewPager
            android:id="@+id/viewPager"
            android:layout_width="match_parent"
            android:layout_height="match_parent"
            app:layout_behavior="@string/appbar_scrolling_view_behavior" />

    </androidx.coordinatorlayout.widget.CoordinatorLayout>
</layout>
以下のようなFragmentを書きます。
class AppBarTabsFragment : Fragment() {

    private lateinit var binding: FragmentAppBarTabsBinding

    override fun onCreateView(
        inflater: LayoutInflater,
        container: ViewGroup?,
        savedInstanceState: Bundle?
    ): View? {
        binding = FragmentAppBarTabsBinding.inflate(inflater)

        val viewPager = binding.viewPager
        viewPager.adapter = AppBarTabsPagerAdapter(requireContext(), childFragmentManager)
        binding.tabLayout.setupWithViewPager(viewPager)
        binding.tabLayoutCollapsed.setupWithViewPager(viewPager)

        binding.appBarLayout.addOnOffsetChangedListener(object : AppBarLayout.OnOffsetChangedListener {

            private var isCollapsed: Boolean? = null

            override fun onOffsetChanged(appBar: AppBarLayout?, verticalOffset: Int) {
                val appBarHeight = appBar?.height ?: return
                val collapsedTabHeight = binding.tabLayoutCollapsed.height

                val shouldCollapse = appBarHeight + verticalOffset == collapsedTabHeight
                if (shouldCollapse == isCollapsed) {
                    // TabLayoutを切り替える必要がない場合は何もしない。
                    // レイアウト操作が頻繁に実行され過ぎて出るWarningを回避するため。
                    return
                }

                toggleTabVisibility(shouldCollapse)
                isCollapsed = shouldCollapse
            }
        })

        return binding.root
    }

    private fun toggleTabVisibility(shouldCollapse: Boolean) {
        if (shouldCollapse) {
            binding.tabLayout.visibility = View.INVISIBLE
            binding.tabLayoutCollapsed.apply {
                visibility = View.VISIBLE
                getTabAt(0)?.text = getString(R.string.tab_title_1)
                getTabAt(1)?.text = getString(R.string.tab_title_2)
            }
        } else {
            binding.tabLayout.visibility = View.VISIBLE
            binding.tabLayoutCollapsed.visibility = View.INVISIBLE
        }
    }
}
PagerAdapterとViewPagerで管理するFragmentでは特別なことはしていないので割愛します(強いて注意点を挙げるなら、ViewPagerで管理するFragmentはNestedScrollViewかRecyclerViewじゃないとAppBarLayoutと連動しません)。
以下、ポイントの説明です。
CollapsingToolbarLayoutを利用しつつ高さが違う2つのTabLayoutを用意する
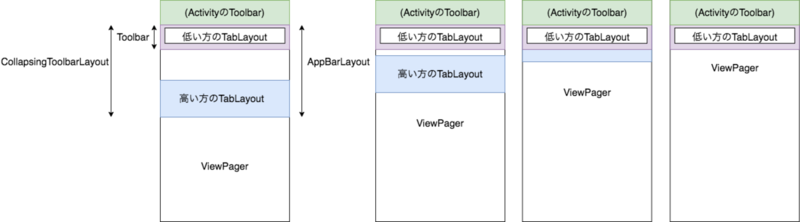
CollapsingToolbarLayoutにapp:layout_scrollFlags="scroll|exitUntilCollapsed"を設定し、子ViewのToolbarにapp:layout_collapseMode="pin"を設定すると、Toolbarが上部に固定されたままAppBarLayoutがその裏に隠れるようにスクロールします。スクロールし切った状態ではToobarだけが表示された状態になります。
さらに、Toolbarの子Viewに低い方のタブを配置します。Toolbarはメニューやタイトルを使わずともただのViewGroupとしても利用できます。通常の最上部固定のアクションバーとしてToolbarを利用する以外ではわざわざただのViewGroupとして利用する理由はありませんが、アクションバー以外のUI要素に対してCollapsingToolbarLayoutを作用させたい場合は例外です。一つ注意することがあって、Toolbarはアクションバーとして利用する前提でデフォルトで先頭に余白が入るため、app:contentInsetStart="0dp"を設定してやる必要があります。
このようにレイアウトを組むと、初期状態からスクロールしていくと高い方のタブが低い方のタブの下に隠れて、最終的に低い方のタブが最上部に固定されたままViewPagerのコンテンツをスクロールできます。
AppBarLayoutのスクロール位置を監視してタブのタイトルとTabLayoutの可視性を切り替える
Toolbarにapp:layout_collapseMode="pin"を設定していると、そのToolbarすなわち今回の場合低い方のタブは常に画面上部に固定されて表示されます。AppBarLayoutがスクロールし切った状態以外ではView.INVISIBLEにする必要があります。
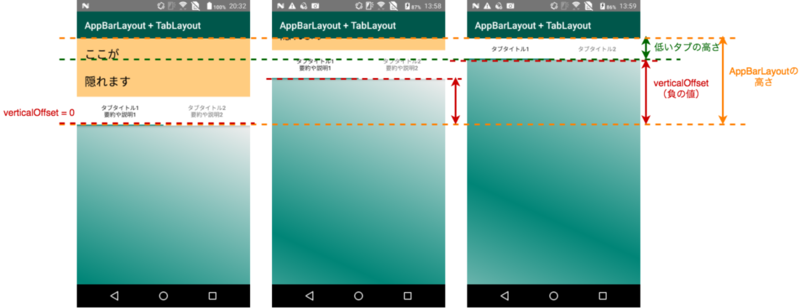
「AppBarLayoutがスクロールし切った状態」を検出するには、AppBarLayout.addOnOffsetChangedListener(AppBarLayout.OnOffsetChangedListener)を利用します。AppBarLayout.OnOffsetChangedListenerをセットすると、AppBarLayoutがスクロールする度にonOffsetChanged(appBar: AppBarLayout?, verticalOffset: Int)が呼ばれます。verticalOffsetはAppBarLayoutの初期位置で0になり、上にスクロールされると移動分の負のpx値が渡されてきます。下の図のように、「AppBarLayoutの高さ+verticalOffset == 低い方のタブの高さ」となった時が、ちょうどAppBarLayoutがスクロールし切って低い方のタブだけが表示された状態となり、そのタイミングで高い方のタブと低い方のタブの可視性を入れ替えるとうまくいきます。AppBarLayoutとTabLayoutの高さ(px)はheightで取得できます。
なお、2つのTabLayoutには同じViewPagerを連携させていて共通のPagerAdapterが使われており、タブのタイトルはそこで設定されています。TabLayoutの可視性を変えただけではPagerAdapterのgetPageTitle()は呼ばれず、タブのタイトルを切り替える処理は別で書く必要があるため、onOffsetChanged()内でTabLayout.getTabAt(0).textを呼んでいます(あまりスマートではないですが…)。
もう1点AppBarLayout.OnOffsetChangedListenerで注意したいことは、タブの可視性を切り替える必要がない時はViewの操作は行わない方がいい、ということです。onOffsetChanged()はAppBarLayoutがスクロール中に立て続けに呼ばれ、その度に毎回Viewの操作をしていると以下のような警告が大量に出ます。
W/View: requestLayout() improperly called by com.google.android.material.appbar.CollapsingToolbarLayout{43923e8 V.ED..... ........ 0,0-720,363 #7f080055 app:id/collapsingToolbarLayout} during second layout pass: posting in next frame
W/View: requestLayout() improperly called by androidx.appcompat.widget.AppCompatTextView{2b52a01 V.ED..... ..S..A.. 101,27-259,60} during second layout pass: posting in next frame
W/View: requestLayout() improperly called by androidx.appcompat.widget.AppCompatTextView{7b560a6 V.ED..... ........ 101,27-259,60} during second layout pass: posting in next frame
パフォーマンスにも影響しかねないので、前回変更した可視性の状態を保持しておいて、前回と同じ状態であれば即returnすることでViewの変更頻度を最低限に抑えられます。
完成した画面

まとめ
本記事では、OpenWorkアプリの企業画面におけるスクロールとタブの連携の実装について紹介しました。
CollapsingToolbarLayoutはアクションバーに対して使うだけでなく、Toolbarを単なるViewGroupと見なせば使いどころが広がるAppBarLayoutはAppBarLayout.OnOffsetChangedListenerでスクロールを監視して任意の処理を書ける
この仕様のように既存のAppBarLayout.ScrollingViewBehaviorだけでは実現できない仕様を実現するには、CoordinatorLayout.Behaviorを自分で実装するというアプローチもあります。最初はそのアプローチを検討したのですが、本記事のようにCollapsingToolbarLayoutを使う方がシンプルに書けたのでこちらを採用しました。一つの方法に固執するのでなく、複数の方法を検討して比較した上で採用することは重要で、複数思いつくにはある程度幅広い知識と経験が必要になってくるので、日々の学習を怠らないようにしたいものです。